Getting Started with CodeTogether Live
CodeTogether Live allows you to host and join collaborative coding sessions from Eclipse, IntelliJ or VS Code, as well as IDE based on these. Guests can join a session from their own IDE with CodeTogether Live installed, even if it’s different from the host’s IDE. Guests can also join a session from any modern browser with no setup required. This guide includes detailed information to help you get started, regardless of which IDE you use.
If you’re looking for the basics you need to know to use CodeTogether Live, see the Quickstart Guide for your IDE.
Logging In
The CodeTogether Free plan allows anonymous usage, limiting sessions to 3 guests for a maximum of 60 minutes. If you have a Pro or Teams account, log in to remove these limits. With a Teams plan, you also unlock advanced features including the ability to host or join team-restricted sessions and terminal write support. To compare plan benefits, see Plans and Pricing.
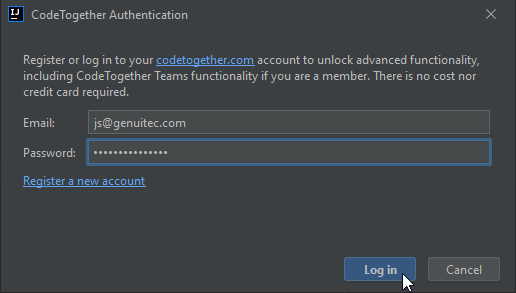
You can create an account on codetogether.com. You also have the option to register an account when you log in to CodeTogether from Eclipse or IntelliJ.
To log in to CodeTogether, click the Log in link in the CodeTogether view. Alternatively, you can use the Log in command/action, or in Eclipse and IntelliJ, select Help > CodeTogether > Log in to CodeTogether.
Hosting a Session
You can host a pair programming session directly from your IDE. All CodeTogether Live sessions are end-to-end encrypted. For details on how your data is kept secure, see CodeTogether Security.
Starting a Session
In the CodeTogether view, click the Host New Session button.
In CodeTogether Teams, you can request an online team member to host a session. Click the Ask to host a session button or context menu action.
Alternatively, use any of the following IDE-specific options to start the session:
- Eclipse
- IntelliJ
- VS Code
- Select Help > CodeTogether > Start Hosting Session.
- Use the Start Hosting Session command.
- Right-click in the editor and select Start Hosting Session from the menu.
- Select text in the editor, and then click Start from the annotation that appears below the selection.
- Select Tools > CodeTogether: Start Hosting Session.
- Use the CodeTogether: Start Hosting Session action.
- Use the CodeTogether: Start Hosting Session command.
- Click CodeTogether in the status bar and select Start Hosting Session.
Controlling Access to the Session
When you start a session, you get to control who joins the session and what control they have over it.
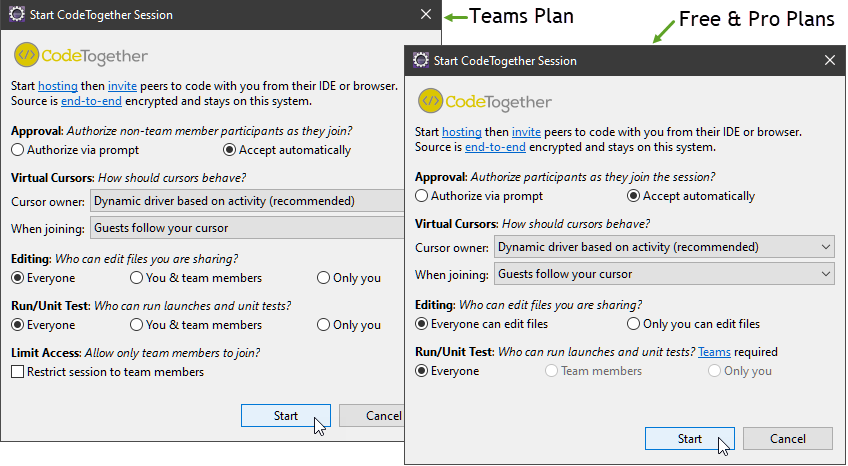
Approval
The default, Authorize via prompt, does not permit users to join a session unless the host explicitly authorizes access via a prompt that appears in the host’s IDE when a participant joins the session. If desired, authorization can be persisted so returning users do not have to wait on authorization again.
This option only applies when non-team members join the session via an invite URL. When signed in, team members never need authorization to join a session, other than a one-time authorization to enable end-to-end encryption between the host and the joining member.
Virtual Cursors
The host assigns how cursors behave in a session and assigns the default cursor behavior when a guest joins the session.
For more details on how these modes work, see Session Basics.
Cursor owner
Select one of the following options to define driving and editing privileges in the session.
- Dynamic driver based on activity—CodeTogether Live dynamically assigns and manages the driver role based on various actions undertaken by session participants. Actions include typing, selecting, navigating between files, IDE dialog use, etc. Non-driver participants can navigate to other files, analyze and edit code, and are eligible to become the driver. This is the default, recommended cursor mode in CodeTogether Live, and was the only available mode until version 2022.1.
- Explicitly assigned driver (strong-style pairing)—The current driver must explicitly grant the driver role to another participant in the session. Non-driver participants can navigate to other files, analyze and edit code; however, they will not become the new driver unless the role is assigned to them by the current driver.
- Only host has a cursor (presentation mode)—In this mode, the host is always the driver. Guests may navigate to other files, and analyze code, but they will not be able to edit it.
When joining
Select the default cursor behavior for guests when they join a session. Guests can always change their cursor behavior after joining the session.
This option is not available when in presentation mode.
- Guests decide cursor behavior—Guests choose whether to share a cursor and take turns driving, or code independently with their own cursor.
- Guests follow your cursor—Guests share a cursor and take turns driving.
- Guests have their own cursor—Guests code independently with their own cursor.
Editing
Select who can edit files. If you select Everyone, both invited guests and team members will be allowed to edit files.
Run/Unit Test
By default, all guests can run remote launches and unit tests. If you have a Teams plan, you have the option to limit access to this feature.
Limit Access (Teams only)
Select the Restrict session to team members checkbox to prevent non-team member participants from joining the session entirely. This option is currently not available to On-Premises users.
Persisted authorizations can be reset on the CodeTogether preference page.
Stopping a Session
In the CodeTogether view under Hosting, double-click (or click in VS Code) Stop sharing or click the Stop Sharing button.
Alternatively, use any of the following IDE-specific options:
- Eclipse
- IntelliJ
- VS Code
Use the Stop Session command.
- Select Tools > CodeTogether: Stop Session.
- Use the CodeTogether: Stop Session action.
- Use the CodeTogether: Stop Sharing command.
- Click In Session in the status bar and select Stop Session.
Inviting Users to a Session
In the CodeTogether view, double-click (click in VS Code) Invite others or click the Copy Invite URL button to copy the Invite URL to your clipboard. Share the Invite URL with others to have them join your coding session.
Double-click (click in VS Code) Invite others to select team members to invite to the session. Alternatively, you can use the Invite to Session button (or context menu action) for each team member in the Your Teams node in the CodeTogether view. Even if you’re logged in to a team account, the Invite URL can still be used to invite users to a session, regardless of whether or not they are members of your team.
You can also use any of the following options to copy the invite URL to your clipboard:
- Eclipse
- IntelliJ
- VS Code
- Click the copy invite URL link at the bottom of an open editor (visible only when there are no participants).
- If you start a session from selected text, click Invite URL from the annotation that appears below the selection.
- Click the copy invite URL link at the bottom of an open editor (visible only when there are no participants).
- Use the CodeTogether: Invite action.
- When you start a session, the Invite URL is automatically copied to the clipboard.
- Use the CodeTogether: Copy Invite URL command.
- Click In Session in the status bar and select Copy Session URL to Clipboard.
- Participants can also invite users to a session using similar techniques.
- The number of participants that can join a session will be limited by your CodeTogether plan.
Hiding Files and Folders
To exclude files, folders or projects from the CodeTogether session, right-click on the resource and select Add to CodeTogether Ignore. The resource is added to a .codetogether.ignore file in the root of the corresponding project. Note that this action cannot be used in a running session.
For additional flexibility, you can also create the .codetogether.ignore file manually in the root of the project, and use Glob patterns to match resources to exclude from the session. To undo an exclusion, simply remove the corresponding line from the file. If the session is active when changes are made, you must restart the session for them to take effect.
Session Timeout
Sessions automatically timeout:
- When no participant joins for 90 minutes
- 45 minutes after the last participant leaves
- After 90 minutes of inactivity
Joining a Session
You can join a session from a supported IDE or modern browser. Whichever method you choose, you lose access to all shared projects when you leave the session or the session ends.
Joining from an IDE
In the CodeTogether view, click Join Remote Session and use the Invite URL that was shared with you.
If logged in to a team, double-click (click in VS Code) a running session from the list under the Remote Sessions node in the CodeTogether view. If you’ve been explicitly invited to a session, you will also see an invitation pop up in your IDE—accept the invitation to join the session immediately. Click the by Invite URL link to join using an invite URL.
Alternatively, use any of the following IDE-specific options to join a session:
- Eclipse
- IntelliJ
- VS Code
- Select Help > CodeTogether > Join Remote Session.
- Use the Join Remote Session command.
- Select Tools > CodeTogether: Join Remote Session.
- Use the CodeTogether: Join Remote Session action.
- Use the CodeTogether: Join Remote Session command.
- Click CodeTogether in the status bar and select Join Remote Session.
In the Join Remote Session dialog, paste in the Invite URL, and specify an identifiable name to join the session.

When you join a session, if the host has allowed guests to choose their initial cursor behavior, the Joining Session dialog will allow you to decide between sharing a cursor with other participants, or having an independent cursor when you first join the session. You can choose to persist this setting, and automatically join the session as soon as your client is ready—the setting can be reset in your IDE’s CodeTogether settings/preferences. After joining the session, you can change your virtual cursor mode.

The resulting workspace is slightly different based on which IDE you use to join the session:
- Eclipse—A new CodeTogether Live project is created in your existing workspace. All projects shared in the session appear as individual nodes immediately under this project.
- IntelliJ—You can choose to join the session from the current window or from a new window. Whatever you choose, the projects shared will appear as a top level nodes within the Project view.
- VS Code—A new window is automatically opened with a CodeTogether Live workspace. The projects shared appear as top level nodes under this workspace.
Joining from a Browser
Open the Invite URL in a browser to join the session—participants still get a full-fledged IDE experience.
If you are joining a teams hosted session, you can log in for access to team-specific functionality. If the session is restricted only to team members, logging in is mandatory.
Customizing the IDE Experience
When you open the Invite URL the first time, you are prompted to customize your IDE experience. You can change these settings every time you join a session; or, from within a session, select File > Settings > CodeTogether: Change IDE Experience.
- Preferred IDE Theme—Select the Light or Dark theme for your preferred IDE.
- Preferred Cursor Mode—Select Shared Cursor to follow the host when joining or Personal Cursor to code with your own cursor. Note that you only have this option if the host chose to allow guests to decide their own cursor behavior when starting the session.
- Key Bindings—Select your preferred IDE to use key bindings your are familiar with for a smooth coding experience.
Specifying Your Name and Joining
After opening the Invite URL in the browser (and customizing the IDE on the initial session), you are prompted for the name to use in the session. Type your name and click Join Now. To change your name during a session, click your name in the status bar or the CodeTogether view and type a new name—the name can be changed at any time, and is persisted across sessions.
Workbench Layout
Use the following options to adjust the layout to your liking:
- Double-click on an editor tab to have it take up the entire browser window, and maximize your coding real estate.
- Press
Alt+Shift+Cto collapse all side panels. - Select the View menu to access additional options to customize the workbench.
Logging Out
To log out of CodeTogether:
- Eclipse
- IntelliJ
- VS Code
- Select Help > CodeTogether > Log out of CodeTogether.
- Use the Log out of CodeTogether command.
Use the Log out of CodeTogether action.
- Use the Log out button in the CodeTogether view.
- Use the CodeTogether: Log out command.
Signing Out of Teams
If you have a CodeTogether Teams plan, instead of logging out, you can just sign out of Teams. When you sign out of Teams, you will no longer be visible to other team members who are currently online. Sessions you start will not be shown in the Remote Sessions node, but you are free to join sessions while remaining offline in Teams by joining via the invite URL.
To sign out of teams, use the Go Offline action or context menu action on the Connected node in the teams section of the CodeTogether view.
Once signed out of teams, you can use the Reconnect Now link to easily sign back in to the team.

Working in the Session
CodeTogether Live includes integrated communication tools including audio, video, text chat and screen sharing. For more details, see Using Audio & Video in a Session.
If the host gives participants full access rights, each member determines whether they want to code alone or together. For more details, see Session Basics.
Because language smarts are provided by the host, participants have access to a number of intelligent features when navigating and editing in a session. For more details, see Participating in a Session.
Getting Help
To view existing issues or suggest a feature, visit our GitHub Issue Tracker.If you have a paid plan, you can email us at support@codetogether.com for technical support.