Session Basics
CodeTogether Live supports coding alone, or with a group while sharing a virtual cursor. Based on settings used to start the session, a single session can have multiple groups and individuals coding or browsing independently of each other. There is also a presentation mode where only the host has a cursor.
When multiple developers are typing simultaneously in the same file, language features like content assist, validation, navigation, etc. will continue to work for each editor, but performance may be affected. We are continuing to improve the reliability of these features in such cases.
Virtual Cursors
Session participants can initially share a virtual cursor with the host or get an independent cursor. When starting a session, the host can choose the initial cursor behavior for those who join the session, or allow participants to choose their cursor when joining the session.
Coding Together with a Shared Cursor
When developers share a virtual cursor, they typically share the same editing context—the same cursor position, and the same selection, in the same file. The following modes allow you to code together:
- Dynamic Driver Mode—If the session was started in this mode, any member of the group sharing the virtual cursor can start driving by simply editing code, making selections, opening files, etc. Other members in the same group automatically follow the driver. No explicit actions are needed to switch drivers, though if multiple members of the group are active at the same time, CodeTogether Live intelligently assigns a driver using recency of activity and cooldown periods. The current driver can explicitly make another member a driver.
- Explicit Driver Mode (Strong-Style Pairing)—In this mode, the current driver must explicitly grant the driver role to another member of the group—while group members can edit and navigate to different files, they cannot change to the driver role unless the role is granted by the current driver.
Followers in a group sharing a virtual cursor can browse code and make edits without leaving the group or becoming a driver. CodeTogether Live uses an intelligent system to allow the member enough time (dynamically adjusted based on activity) to make their changes or browse code, and then brings them back to follow the driver when appropriate. In the dynamic driver mode, you may become the new driver if the current driver is idle.
Coding Alone with Your Own Cursor
Coding alone is similar to coding in a regular IDE. The developer alone decides which files to browse or edit. Other participants in the session are not disrupted, nor do they follow along as the developer opens new files and makes edits.
Force All to Follow
Hosts and guests have the ability to bring everyone to their location with the Force all to follow you action in the CodeTogether view. To avoid abuse in larger sessions, guests do not have this option if more than 3 guests are in the session.
Changing Your Virtual Cursor Mode and Driver
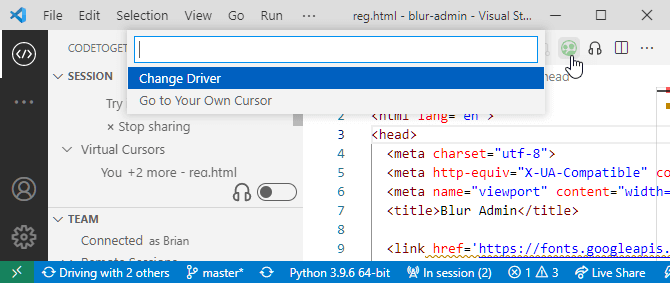
In the Virtual Cursors section of the CodeTogether view, double-click (or click in VS Code or a browser) another group or individual coding alone to start sharing their virtual cursor, or select the Go to your own cursor node to start coding or browsing independently.
Additional options are available depending on the client you are using.
- Eclipse & IntelliJ
- VS Code
- Browser
In Eclipse and IntelliJ, an annotation in the bottom right of the editor shows your current status and incudes actions to change your status.
Color Codes
Color codes are used in addition to the text to make your current state more clear. The color is used for both the editor border and to highlight the annotation.
- Grey—Following or waiting for others to join

- Light blue—Coding alone

- Green—Driving


- Yellow—Browsing or editing with another active driver who shares your virtual cursor

Available Actions
- Stop—Click this link when sharing a virtual cursor to get your own cursor.
- Follow—Click this link when coding on your own to begin sharing a virtual cursor with a current driver, or if browsing/editing on your own while sharing a cursor, this link immediately returns you to the active driver.
- Change Driver/Let Drive—Use these links when you are the current driver to grant the driver role to a different group member.
To remove the colored editor border and editor annotation, clear the Show collaboration status in editor checkbox from CodeTogether Preferences/Settings.
- Use the
Ctrl + K Chotkey to toggle between sharing a virtual cursor and having your own cursor. - In the collaboration status area of the menubar, hyperlinks will allow you to follow others (share their virtual cursor), stop following (code alone), and change the driver.
Using the CodeTogether View
To see an overview of your active session, use the CodeTogether view in the IDE or the browser. In the IDE, if signed in to a Teams account, you also get an overview of other team members online and sessions they are currently running. Several team specific actions are also available.
- In the IDE
- In the Browser
Open the CodeTogether view in the IDE as follows:
- Eclipse—Select Window > Show View > Others > CodeTogether > CodeTogether.
- IntelliJ—Select View > Tool Windows > CodeTogether.
- VS Code—Select View > Open View > CodeTogether.
IntelliJ Example:
Chrome Example:
Details
The tree in the CodeTogether view has multiple nodes as described below. In addition, most nodes have multiple actions available. To see these actions, hover a node to see buttons, or right-click to view the context menu.
Select an end-node from the tree to execute the corresponding action. The method to select an end-node differs based on how you join the session. In Eclipse and IntelliJ, double-click to select actions. In VS Code or a browser, click to select actions.
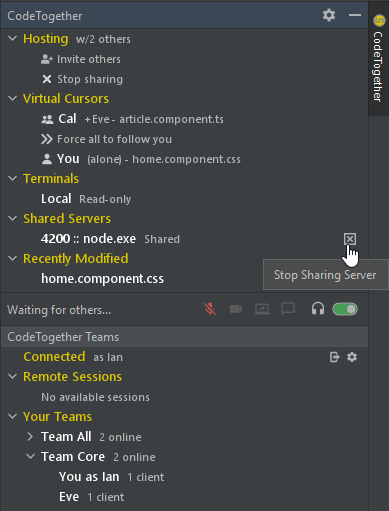
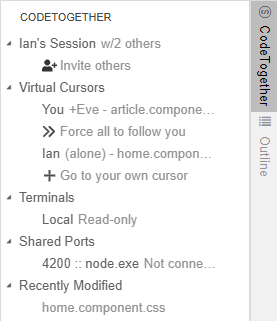
Virtual Cursors—Each group or individual coding alone is listed along with the active file. To share a cursor with a group or individual, select the node or click the Join Cursor button. To open the file without changing your virtual cursor, click the View Cursor Location button. Additional options include: Force all to follow you, and Go to your own cursor when sharing a cursor with others.
Terminals—On the host, all terminals are listed. To stop sharing a terminal and remove it from the CodeTogether view for all participants, click the Stop Sharing button. The terminal remains in the host's Terminals node, but cannot be shared again in the current session.
For participants, only terminals shared by the host are listed. To open a terminal, select it from the list, or click the Focus Terminal button. If you are signed in with a Teams account, you can request write access to the terminal by using the Request Write Access button or by typing in the terminal.
Shared Servers—On the host, each server is listed, including those detected automatically and manually added. The host can choose to start or stop sharing a server anytime during the session. When a server is no longer shared, it is removed from the participant’s CodeTogether view and they can no longer interact with it.
For participants in an IDE, you can select the server or use the Connect Server button to make the server available locally. The node then displays the local address for the server. Use the Disconnect Server button to free up the local port being used.
Recently Modified—Lists files that were recently modified in the current session. Select a file to open the file, or click the Open Modified File button.
CodeTogether Teams Section
This section is displayed if you are connected to a Teams account, or an On-Premises installation.
This section is not shown in Eclipse. You will see Connected and Your Teams nodes in the CodeTogether view prior to starting or joining a session.
- Connected—Displays your name in the current session. You can click the Go Offline button to disconnect from the Teams server. You can also click the Open Settings button to open the CodeTogether Settings/Preferences, including the option to change your name.
- Remote Sessions—Lists sessions your team members have running. You can join any session listed under this node without being explicitly invited to the session.
- Your Teams—Lists teams and online members in each team. Use these nodes to invite team members to a session or ask them to host a session.
Navigating and Editing in a Session
Host-provided language smarts allow you to take advantage of a number of useful features when navigating and editing code in the session, regardless of whether you join the session from an IDE or browser. Refer to Participating in a Session for details.